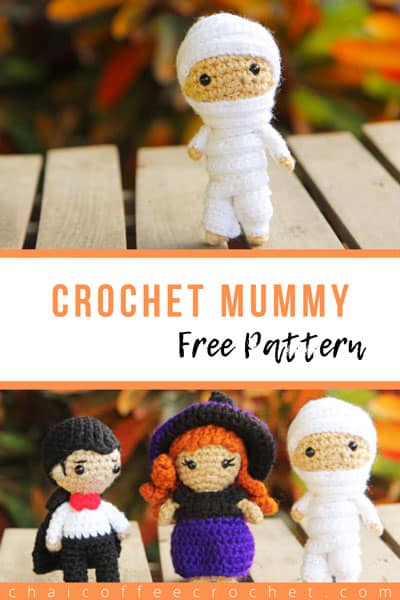
Halloween Crochet Mummy Free Pattern
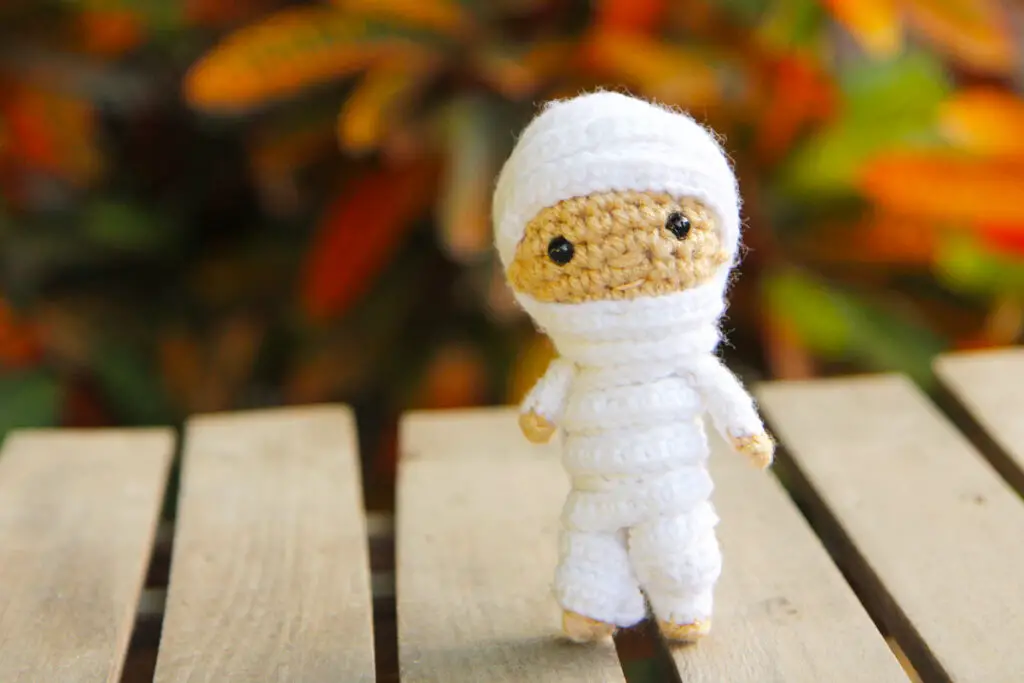
Marvin the crochet mummy has joined our not-so-spooky series of little Kozu Palm Pals crochet dolls for Halloween. We wanted to round off our series with another addition (because, well, we like trios!) and we just had to crochet a small mummy for our Halloween collection.
One of my most favourite costumes was when I dressed up as a mummy for Halloween in the fourth grade. It seemed like a great idea at the time. Until, of course, I got to the Halloween party and all the kids started pulling off my bandages, which was not so fun! lol.
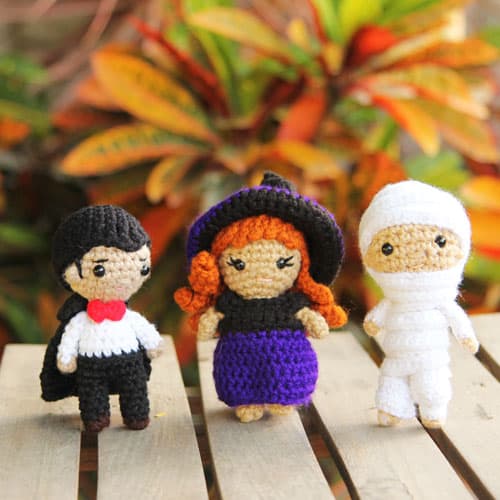
Lucky for Marvin, our cute little amigurumi mummy, his bandages are all sewed into place so he doesn’t have to worry about that at all! This crochet mummy makes an adorable addition to our Halloween amigurumi collection, along with Zeena the crochet witch and Viktor the crochet vampire.
About this Amigurumi Mummy Pattern
This crochet mummy pattern works up to be approximately 4.5 inches tall. He was designed using DK yarn and a 2.5 mm hook but you can use any yarn with the relevant hook. Try using chunky yarn to crochet a bigger and more cuddly mummy!
This mummy pattern can be a little bit tricky to crochet because most of it is worked in the back loops, which can be very fiddly on something so small. I chose to crochet the mummy’s body and head in the back loops to give the impression of bandages in areas where the body isn’t covered with a bandage.
However, beginners can adapt this pattern by keeping everything worked in both loops. The bandages cover most of the body and so there won’t be a huge difference if you were to crochet your mummy amigurumi in both loops.
I’ve also added ears to my crochet mummy because I just love the little ears! I do realise, however, that mummies usually have their ears are covered. So the ears are completely optional in this pattern. If you plan to cover the head past the ears then don’t bother making them – because why put in all the work when you’re going to cover them any way!
If you would like an ads-free, print-friendly PDF version of our pattern, you can buy it from our Ravelry store.
Want to save this pattern for later? Save this pin to your Pinterest board.
Crochet Mummy Free Pattern
This pattern is for your personal use only and cannot be sold, copied, or reproduced in any way without permission from the designers. You may sell finished objects made from this pattern in small quantities but please give credit to chaicoffeecrochet.com as the pattern designer.
Tools and Supplies You Will Need to Crochet a Mummy
- Yarn: You need a small amount of DK yarn in skin colour and white.
- 2.5 mm crochet hook
- Tapestry needle
- Stitch marker
- Polyfill stuffing
- Two 6 mm safety eyes
- Light pink embroidery thread for the mouth
Crochet Mummy: Stitches Used and Abbreviations
This pattern is written in US terms and crocheted in continuous rounds, unless specified otherwise.
Sl st: slip stitch
SC: single crochet
INV DEC: invisible decrease
INC: two SC in the same stitch
BLO: back loops only
How to Crochet a Mummy
Note: This pattern is worked in the BLO in a lot of places to give the impression of a bandage in places where the bandage that you crochet isn’t able to reach. If you’re a beginner and find crocheting in the back loops tricky, it is fine to crochet these parts in both loops, as most of your Mummy will be covered in bandages anyway.
Legs
Begin with skin colour yarn.
Stuff legs lightly as you go.
Round 1: 6 SC into a magic circle (6)
Change to white
Round 2-6 (5 rounds): 6 SC in BLO (6).
Fasten off. Make sure that you’ve pulled the magic circle tight so that stuffing doesn’t escape from it.
Repeat rounds 1-6 for the second leg but don’t fasten off.
Body
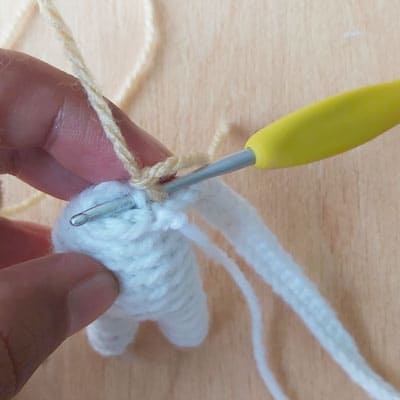
Stuff as you go. Now we will begin joining the legs (see the end of the pattern for a photo tutorial of how to join legs.)
Round 7: Chain 2 and SC in the BLO of the next unworked stitch of the first leg. Place a stitch marker in this stitch to mark the start of your round. SC in the BLO of the remaining 5 stitches of the first leg until you reach the chain, SC in each of the 2 chains, SC in the BLO of the 6 stitches of the next leg, and SC on the other side of each of the two chains until you reach your stitch marker. (16)
Round 8-12 (5 rounds): SC around in BLO (16)
Round 13: (2 SC, INV DEC) in BLO four times (12)
Round 14: (2 SC, INV DEC) in BLO three times (9)
Round 15: (SC, INV DEC) in BLO three times. (6)
Now we will continue on to make the bandage for the body.
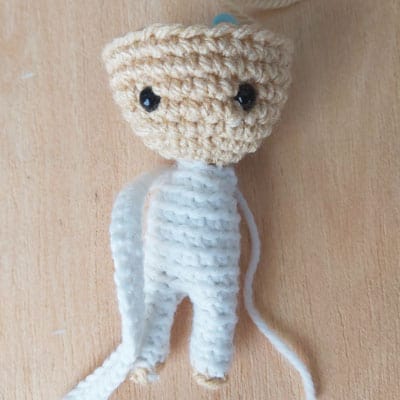
Chain 121. Wrap the chain around your Mummy to see if you’re happy with the length. You can add more or less chains to make it longer of shorter. Then, starting from the second chain on your hook, SC back down the chain and slip stitch to the front loop of the next stitch on the body of your doll. Fasten off the white yarn and leave a long tail for sewing.
Head
Attach skin colour yarn to the back loop of the same stitch that you slip stitched in the front loop of for your bandage.
Round 16: INC around in BLO (12)
Round 17: (SC, INC) six times (18)
Round 18: (2 SC, INC) six times (24)
Round 19-23 (5 rounds): SC in each stitch around (24)
If you’re using safety eyes, insert them between Rounds 20 and 21, four stitches apart.
Ensure that you have stuffed the body well, especially the neck. I use the back of a scissor to get the stuffing in but you can use anything small enough to really push the stuffing in to ensure that the neck is firm! Continue stuffing the head.
Round 24: (2 SC, INV DEC) six times (18)
Round 25: (SC, INV DEC) six times (12)
Ensure that you have stuffed the head well.
Round 26: INV DEC six times (6)
Fasten off and leave a long tail. Insert needle in front loop of each stitch and pull tight to close. Using the tail, embroider the nose one row below the eyes. Embroider a mouth one row below the nose.
Arms (make 2)
Do not stuff
Begin with skin colour.
Round 1: 4 SC into a magic circle (4)
Change to white
Round 2-6 (5 rounds): SC around in BLO (4)
Fasten off and leave a long tail for sewing. Sew onto the body between Round 13 and 14.
Ears (make 2) – Optional
Note: If you prefer to wrap the bandages around the ear area, you can leave them off – because why crochet them when they’re going to be covered!
Using skin colour yarn.
Round 1: 1 SC inside a magic circle
Fasten off and leave a long tail for sewing. Sew onto the head, approximately 2-3 stitches away from the eyes.
Hair Cap
Using white yarn.
Round 1: 6 SC into a magic circle
Round 2: 6 INC in BLO (12)
Round 3: (SC, INC) six times in BLO (18)
Round 4: (2 SC, INC) six times in BLO (24)
Round 5-9 (5 rounds): 24 SC in BLO (24)
Note: The hair cap width can vary based on the yarn that you’re using so try it onto your doll’s head and see if you want to increase or decrease rounds here before working on the bandage.
Chain 151. Wrap the chain around your Mummy to see if you’re happy with the length. You can add more or less chains to make it longer of shorter. Then, starting from the second chain on your hook, SC back down the chain and slip stitch to the next stitch of the hair cap. Fasten off and leave a long tail for sewing.

Sew the hair cap onto your doll, with the bandages at the back. Wrap the bandages from both the body and hair cap around your Mummy and pin them in place. For the legs, I wrap the bandage around the first leg and then bring it up from the back of the first leg and take it around the second leg. (You can wrap them however you like. I do it a little differently each time for a different look. Have fun with it!) Once you’re satisfied with the placement of your bandages, sew the bandages into place.
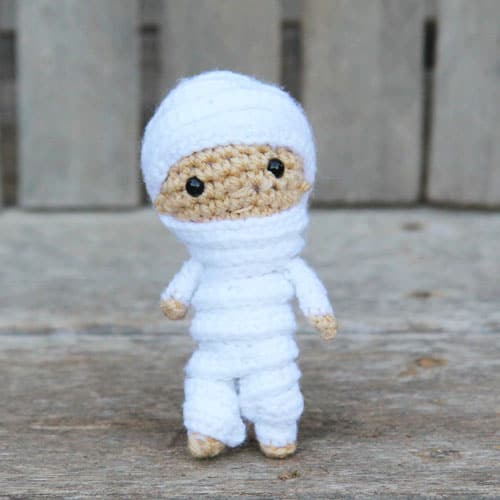
Your small crochet mummy doll is complete! We would love to see your crochet mummies, so share them on our Facebook group Amigurumi with Chai Coffee Crochet or tag us on Instagram @chaicoffeecrochet We like to share a selection of makes from our patterns in our stories and highlights.
Is it easy to crochet a mummy doll?
This mummy doll is simple to crochet in that it just uses basic crochet stitches. However, crocheting in the back loops throughout may be difficult for beginners, especially in a piece this tiny. I would recommend that beginners crochet in both loops for this doll. It’s a very small detail and most of those back loops are covered over with the bandages anyway.
How long does it take to crochet a small mummy?
This small crochet mummy takes a couple of hours to crochet, which is great because you can make many more before the spooky season!
What are other Halloween crochet amigurumi patterns?
If you enjoyed this pattern, try our little crochet witch Zeena or our Viktor the small crochet vampire who would make cute little companions for your amigurumi mummy. Also check out our round up of free Halloween amigurumi patterns from some of our favourite designers!
What are other small crochet doll patterns?
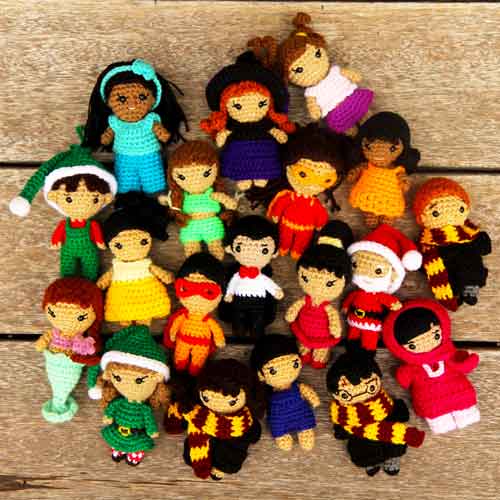
If you enjoyed this mummy, don’t miss our the rest of the small crochet dolls in our Kozu Palm Pals series! They are all just 4.5 inches of ultimate cuteness!