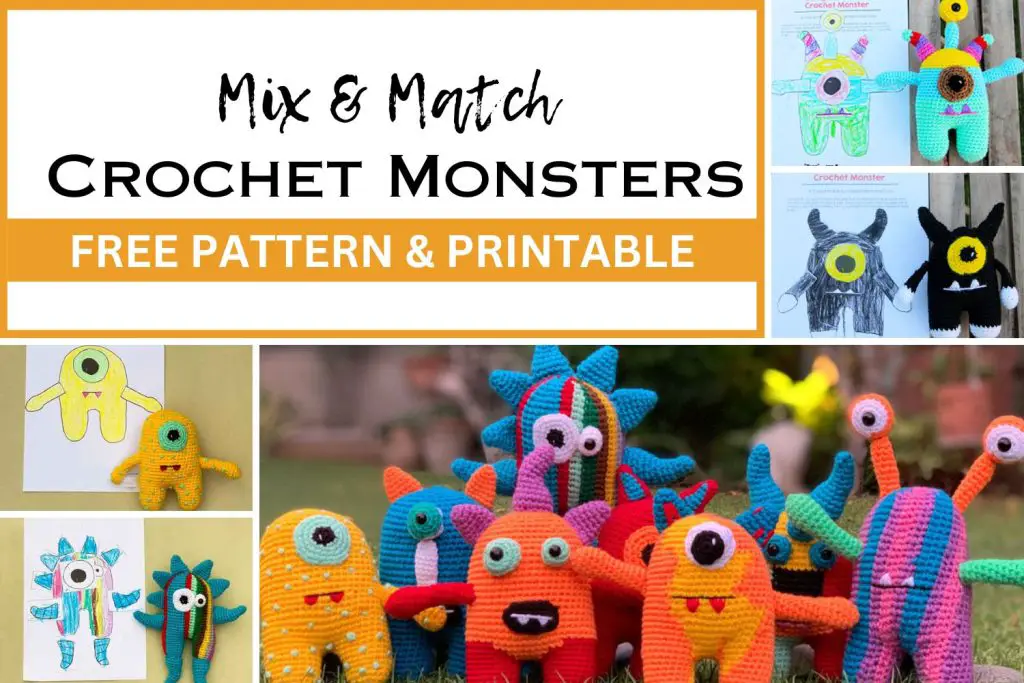
Design your own amigurumi crochet monster in this free pattern & printable
Who doesn’t love a crochet monster? They are so CUTE. Plus, the best part -they have no rules! Love those eyes? Why not add three? Who needs two arms when you can have four?
We were trying to come up with a fun Halloween crochet project and decided to do something a little different – we decided to let YOU design your own unique crochet monster by giving you free crochet patterns for all the different monster elements and letting you put them together. Or even better? Let kids design their own crochet monsters as a craft activity using our free Monster Design Worksheet so that they have their own personalized amigurumi monster. Besides, what better way to protect your child from the monsters under their bed than a crochet monster that they have designed themselves?
The best part is that the free crochet monster pattern is an easy Halloween amigurumi pattern – even a beginner can do it!
If you like the idea of kids designing their own toys, also check out our Design Your Own Crochet Doll pattern.
How to design your own amigurumi crochet monster
Designing and crocheting your unique monster is super simple to do!
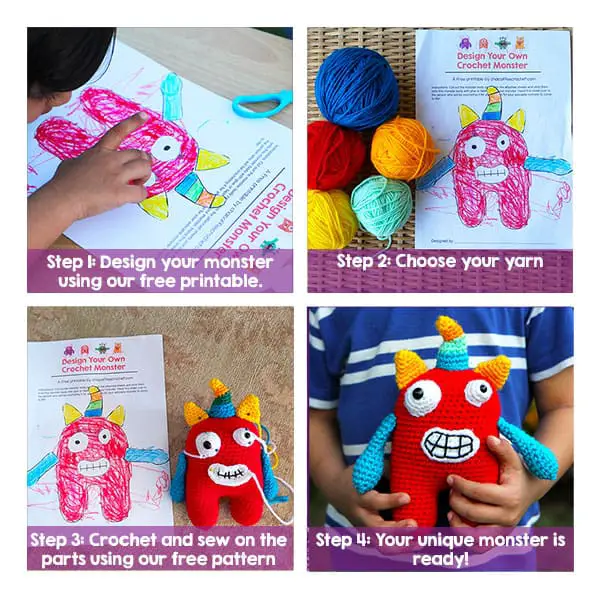
Step 1: Design Your Own Crochet Monster Using our Free Printable
The printable has different body parts that you, or a kid in your life, can cut out and stick onto the monster, making it truly unique! You can sign up below to get our free printable!
In designing your monster, be see our tips below to make the process a little easier and more manageable, depending on your own skill level.
Step 2: Choose Your Yarn and Plan Your Project
This is the fun part! Dig through your yarn stash to find the colours that match the colours of the monster. You will also want to plan out your monster by looking through the patterns and writing out how many of each pattern element you need and in what colour so that you can keep track oh how many of each thing to make and in what colours.
Step 3: Crochet Your Monster and it’s Parts Using Our Free Pattern
Now it is time to crochet your unique monster to life! Crochet the body and each of the parts using our free patterns below. Keep the original drawing in front of you as a reference so that you can ensure that the colours are exactly as you want them. If there are colour changes, you will need to eyeball where they go, as you crochet.
Once you have crocheted all the parts, pin them onto your monster to ensure that they are place correctly. Again, use the drawing as a reference. Now sew the parts on.
Step 4: Your Monster is Ready for Gifting!
Your super unique crochet monster is now ready! You can give it to the designer now for lots of smiles and joy!
Get your free crochet Monster Design Printable
To begin, you will need to get our crochet Monster Design sheet. The sheet has the monster body shape and then sheets to cut out the different body parts.
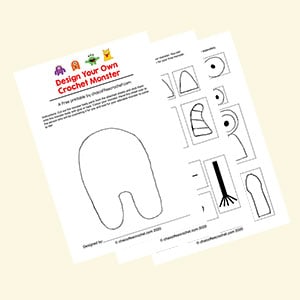
Our free Monster Design Worksheet printable is exclusively available to subscribers to our newsletter. You can subscribe below and you will get the sheet in your welcome email.
If you are already a subscriber, you should have received a link to the printable when you subscribed. If you have subscribed and haven’t received your sheet, check the spam folder and promotions tab in your email. If you still cannot find it, contact us with the email address that you subscribed from.
Tips for Designing Your Amigurumi Monster
When having children design their own crochet monsters, here are some pro-tips to make the process smoother:
- Ensure that they are using colours of yarns that you have (or are able to get). So if you’re just using yarn from your stash, just give them crayons or coloured pencils of those colours only.
- Tell them to make sure they have 2 finger spaces between each part that they add to the monster. Because the amigurumi monsters will be 3-dimensional, they will feel very cluttered when sewing things on if you don’t keep enough space between the parts.
- If you’re a beginner, you can make sure the black crayon “magically” disappears when they’re designing so that you don’t have to make a fully black toy like Kozu’s, since black yarn can be tricky. Lol.
- To make it easier to do, you may want to instruct them not to add vertical stripes (all colour changes should be done horizontally) – as those can be challenging to do when making amigurumi.
- If you would like to have the back of the monster designed as well, take an extra printout of the first sheet of the printable and use that for the back.
- If you like, get the children involved in selecting the yarn. That helps build anticipation for their amigurumi monsters and allows them to feel like a part of the process.
- Once you crochet the monster parts, be sure to pin them onto your amigurumi monster before you sew them on to be sure that they all fit together. Keep the design handy as a reference so that you can compare and ensure that your amigurumi monster matches the monster designed by your child!
- If you’re a crafter who sells finished crochet items, you may want to sell this product as a monster activity kit, as we did when we had our most recent craft fair.
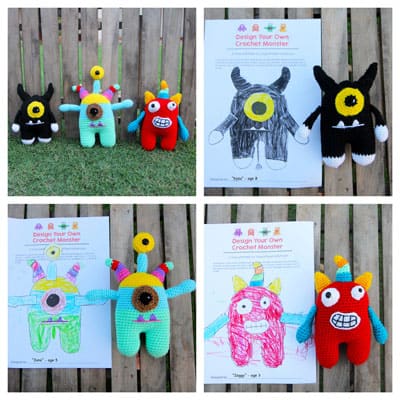
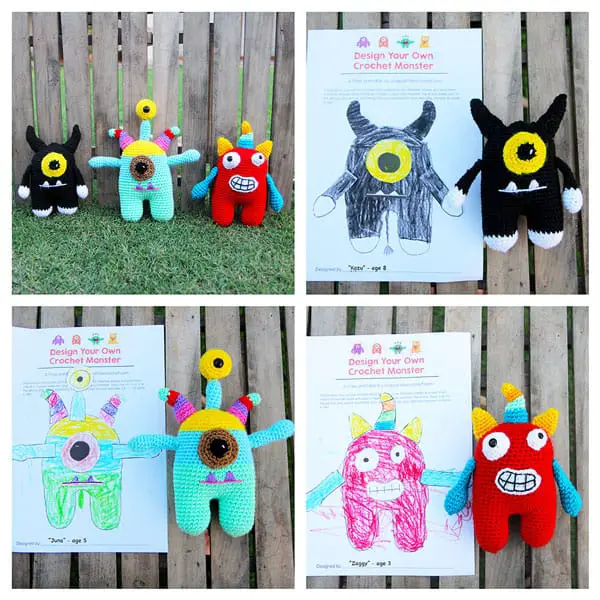
Our Amigurumi Monsters
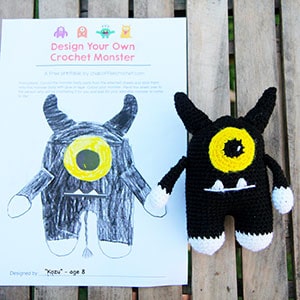
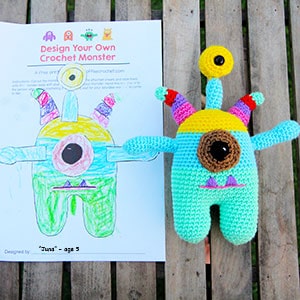
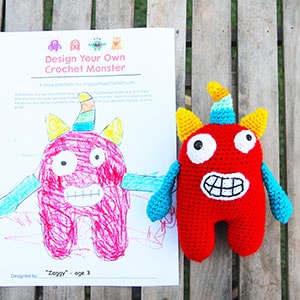
We had Kozu, Juna, and Zaggy (Kiran’s three boys aged 8, 5, and 3 respectively) test our printable. We have always wanted to make them something that they themselves designed, but figuring out how to crochet a child’s drawing with its various shapes can be very time-consuming and daunting. This printable and its associated patterns give a structure that makes it quick and easy to do, while still allowing for their creativity.
To be honest, we were blown away by their monster designs! Each was so unique and so true to their personal style, with such adorable names. We gave them their crochet monsters a couple days ago and they’ve been inseparable since. They are so chuffed to see their creations come to life.
We hope you’ll enjoy crocheting this free amigurumi monster pattern as much as we did!
If you would like an ads-free, print-friendly PDF version of our pattern and our Monster Design Sheet, you can buy it from our Ravelry store.
Want to save this pattern for later? Save this pin to your Pinterest board or add it to your Ravelry queue or favourites.
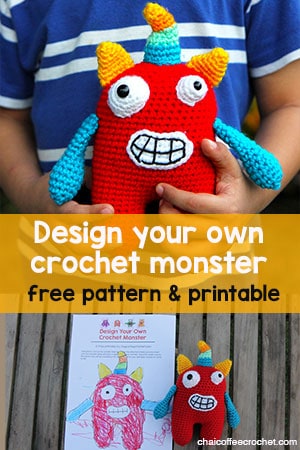
Crochet Monster Free Pattern
This pattern is for your personal use only and cannot be sold, copied, or reproduced in any way without permission from the designers. You may sell finished objects made from this pattern in small quantities but please give credit to chaicoffeecrochet.com as the pattern designer.
Crochet Monster: Stitches & Techniques
Sl st: Slip stitch
SC: single crochet
INV DEC: invisible decrease
INC: two SC in the same stitch
BLO: back loops only
Tools & Materials Needed to Crochet a Monster
- Yarn: You need less than 100 grams of yarn in the various colours that you have decided based on your monster design
- Crochet hook: For amigurumi, you typically go down one or two hook sizes from that recommended on your yarn label.
- Tapestry needle
- Stitch marker: You can use a locking stitch marker but even a scrap of yarn will do! This pattern is worked in the round, so place a stitch marker at the first stitch of each round so that you can keep track of where each row begins.
- Polyfill stuffing
- Safety eyes: The eye sizes vary based on the eyes that you use in your design. See the detailed pattern for each eye style to determine which eyes you need.
Crochet Monster Finished Size
Each monster is approximately six inches tall, if you’re using DK yarn and a 2.75 mm hook. If you would like your monster to be larger, you can use a thicker yarn with the relevant hook.
How to Crochet the Monster Parts
Begin by making the body of your crochet monster. And then choose the relevant mix and match elements.
Crochet Monster Body
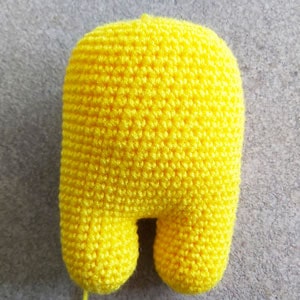
Stuff as you go.
We will be working from the legs up
Round 1: 5 SC into a magic circle (5)
Round 2: INC in each stitch around (10)
Round 3: (SC, INC) five times (15)
Round 4: (2 SC, INC) five times (20)
Rounds 5-10 (6 rounds): SC in each stitch around (20)
Fasten off for the first leg.
Repeat rounds 1-10 for the second leg but don’t fasten off.
In the next round we will be joining the legs. See our tutorial for how to join legs for amigurumi if you are unsure how to do this.
Round 11: Chain 3 and SC in the next unworked stitch of the first leg and place a stitch marker to mark the start of your round. SC in the remaining 19 stitches of the first leg until you reach the chain, SC in each of the 3 chains, SC in the 20 stitches of the next leg, and SC in the three stiches of the chain until you reach your stitch marker. (46)
Round 12 – 31 (20 rounds): SC in each stitch around (46)
Round 32: (9 SC, INV DEC) four times, 2 SC (42)
Round 33: (5 SC, INV DEC) six times (36)
Round 34: (4 SC, INV DEC) six times (30)
Round 35: (3 SC, INV DEC) six times (24)
Round 36: (2 SC, INV DEC) six times (18)
Round 37: (SC, INV DEC) six times (12)
Round 38: INV DEC six times (6)
Fasten off. Insert needle in front loop of each stitch and pull tight to close and weave in your yarn tail.
Eyes
Big Eye
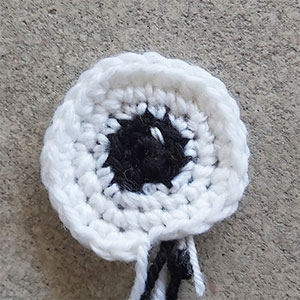
Begin with the pupil colour.
Round 1: 5 SC into a magic circle (5)
Round 2: INC in each stitch around (10)
Change to the colour of the sclera (or at least, that’s what Google told me the white part of an eye is called!)
Round 3: (SC, INC) five times in BLO (15)
Round 4: (SC, INC, SC) five times (20)
Round 5: (3 SC, INC) five times (25)
Sl st into the first stitch and fasten off and leave a long tail for sewing. Use white embroidery thread or yarn to embroider on the eye glint on the pupil. Do not stuff when sewing on.
Medium Eye
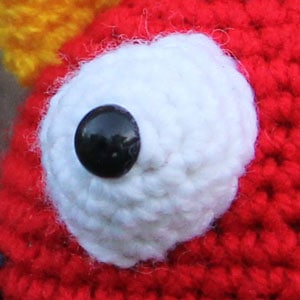
Round 1: 5 SC into a magic circle (5)
Round 2: INC in each stitch around (10)
Round 3: (SC, INC) five times in BLO (15)
Round 4-5 (2 rounds): SC in each stitch around (15)
Sl st into the first stitch and fasten off and leave a long tail for sewing. Insert a 10mm safety eye into the centre of the eye. Stuff lightly when sewing on.
Small Eye
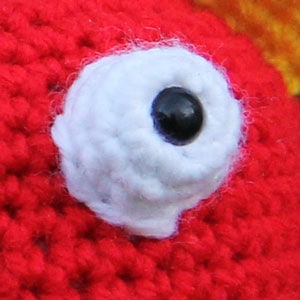
Round 1: 5 SC into a magic circle (5)
Round 2: INC in each stitch around (10)
Round 3-4 (2 rounds): SC in each stitch around (10)
Sl st into the first stitch and fasten off and leave a long tail for sewing. Insert a 9mm safety eye into the centre of the eye. Stuff lightly when sewing on.
Bulging eye with eye stem
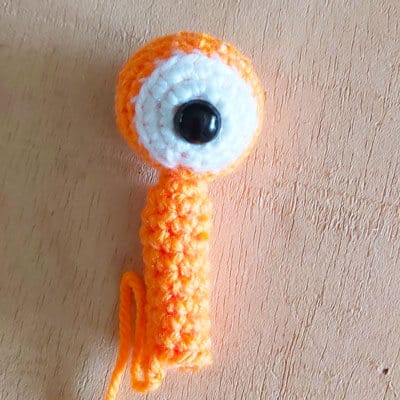
This pattern is for the bulging eye with the eye stem. However, when designing, you can also cut off the eye stems in the design sheet and use the bulging eye on its own.
Eye stem
Round 1: 8 SC into a magic circle (8)
Round 2-10 (9 rounds): SC in each stitch around (8)
Fasten off and leave a long tail to sew onto the head.
Inner eye
Begin with the colour of the scalera (or the white of the eye)
Round 1: 6 SC into a magic circle (6)
Round 2: INC in each stitch around (12)
Round 3: (SC, INC) six times (18)
Change to the outer colour of the eye
Round 4: SC in BLO around (18)
Round 5-7 (3 rounds): SC around (18)
Insert a 12 mm safety eyes in the center of the magic circle and stuff the eyes.
Round 8: (SC, INVDEC) six times (12)
Round 9: INVDEC six times (6)
Fasten off. Insert needle in front loop of each stitch and pull tight to close.
Eye Assembly
Sew the eyes onto the eye stem. Stuff the eye stem and sew it onto the body.
Arm
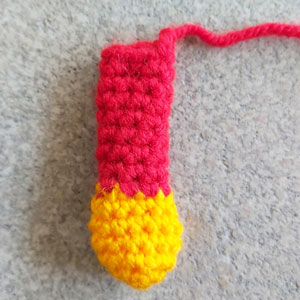
Round 1: 5 SC into a magic circle (5)
Round 2: INC in each stitch around (10)
Round 3: (4SC, INC) twice (12)
Round 4-5 (2 rounds): SC in each stitch around (12)
Round 6: (4 SC, INV DEC) twice (10)
Change colour here if your hand and arm are different colours.
Round 7: (3 SC, INV DEC) twice (8)
Round 8-15 (8 rounds): SC in each stitch around (8)
Fasten off and leave a long tail for sewing. Stuff the bottom of the arm lightly. (However, if you want it sticking straight out like Cutie, Juna’s monster, you should stuff it throughout and firmly.) Sew the arm closed and sew it onto your monster.
Spike
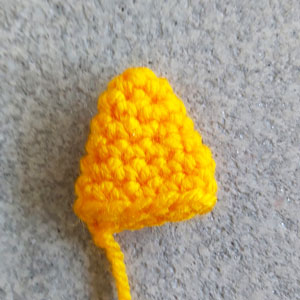
Round 1: 6 SC into a magic circle (6)
Round 2: SC in each stitch around (6)
Round 3: (SC, INC) three times (9)
Round 4: SC in each stitch around (9)
Round 5: (2 SC, INC) three times (12)
Round 6-7 (2 rounds): SC in each stitch around (12)
Fasten off and leave a long tail for sewing. Flatten the spike and sew it closed before sewing it onto your monster.
Horn
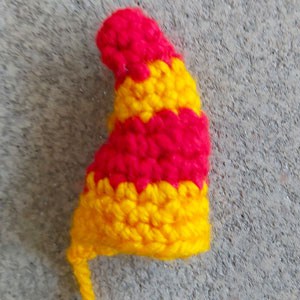
The colour changes are indicated if you have a different colour for each section of the horn noted on the printable. However, if your colour scheme is solid or follows a different pattern, these colour changes will not apply.
Begin with colour on the top of your horn
Round 1: 6 SC into a magic circle (6)
Round 2-3 (2 rounds): SC in each stitch around (6)
Change colour (optional)
Round 4: (SC, INC) three times (9)
Round 5-6 (2 rounds): SC in each stitch around (9)
Change colour (optional)
Round 7: (2 SC, INC) three times (12)
Round 8: (INC) two times, (INV DEC) four times, (INC) two times (12)
Round 9: SC in each stitch around (12)
Change colour (optional)
Round 10: (3 SC, INC) three times (15)
Round 11-12 (2 rounds): SC in each stitch around (15)
Fasten off and leave a long tail for sewing. Stuff the horn before sewing it onto your monster.
Mouths
We have suggested a few mouth types. However, you can always embroider any mouth you like or turn the cutout around in the printable and draw your own detailing on the mouth.
Oval mouth with sharp teeth
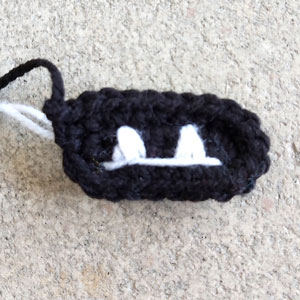
Chain 8.
Round 1: Starting from the second chain from the hook, 6 SC, 3 SC in the last chain, 5 SC on the other side of the chain, INC in the last chain (16)
Round 2: INC, 5 SC, (INC) in the next 3 stitches, 5 SC, (INC) in the next two stitches (22)
Fasten off and leave a long tail for sewing. Embroider on the teeth and mouth line.
Curved mouth with toothy smile
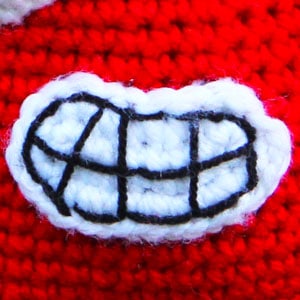
Chain 9.
Round 1: Starting from the second chain from the hook, 7 SC, 3 SC in the last chain, 6 SC on the other side of the chain, INC in the last chain (18)
Round 2: INC, (DEC) three times, (INC) in each of the next 11 stitches (27)
Fasten off and leave a long tail for sewing. Embroider on the teeth and mouth line.
Embroidered mouth
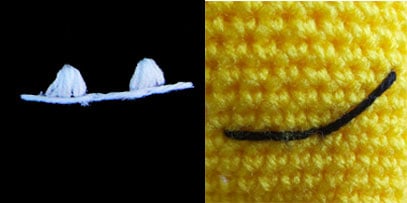
The last two mouths on the Monster Design Worksheet should be embroidered directly on your toy.
Monster Tail
We didn’t have a tail in our initial worksheet when we made it for the boys. However, Kozu and Juna assured us that monsters must have tails (duh!) and drew them on. You learn something new everyday! Lol. So we now have a tail. Tip: If you don’t want the tail to curl as much, use a larger hook.
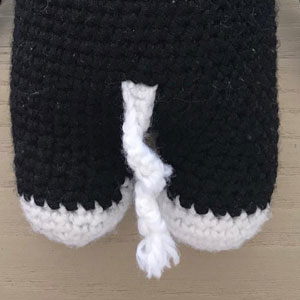
Row 1: Chain 12
Row 2: Starting from the second chain from the hook, 11 SC
Fasten off and leave a long tail for sewing.
Cut three strands of yarn approximately 3 inches in length. Fold them in half and latch them through the end of the tail and cut them so they are approximately a quarter inch each. Trim the tail to your desired length. See our tutorial on how to add hair to amigurumi.
Your crochet monster is now done!
We hope you enjoyed this free pattern! We would love to see your unique crochet monsters, so share them them in our Facebook group Amigurumi with Chai Coffee Crochet or tag us on Instagram @chaicoffeecrochet Share your finished monsters with the hashtag #chaicoffeecrochet
How long does it take to crochet a monster?
The time that it takes to crochet a monster can vary based on both your crochet speech but also on how complex the monster is that has been given to you (for example, the number of parts that have been chosen, how many colour changes, etc). But in general you should be able to crochet your monster in about 5 hours, but this can vary a lot since each monster is different and unique!
How can I crochet a large monster?
If you want your monster to be larger, you can use a thicker yarn with the relevant hook (typically for amigurumi you go 2-3 hook sizes lower than the hook recommended on the yarn label). With super bulky yarn, your monster can be three times as large!
Is it easy to crochet a monster?
This pattern was designed as an easy crochet monster pattern that even beginners can use! However, the ease of design is based on how complicated the design is. Designs that use a lot of black yarn, frequent colour changes, or vertical stripes will be more complicated. Designs that are more uniform in colour are very easy for beginners. In the tips, we have some additional instructions that beginners can give children while designing their monsters to make it easier to crochet.
What are other crochet Halloween patterns that I can make?
If you’re looking for more Halloween crochet projects, we have a bunch for you! Try Zeena, the mini crochet witch, Marvin the crochet Mummy, or Viktor the amigurumi Vampire. We also a tiny no sew crochet ghost that would make for a great Halloween keychain or giveaway!
OMG this is wonderful. I have 2 little people who are going to love this
Thank you for the great instructions. Thank you especially for sharing.
Oh how lovely! We would love to see your monsters once they’re ready 😊