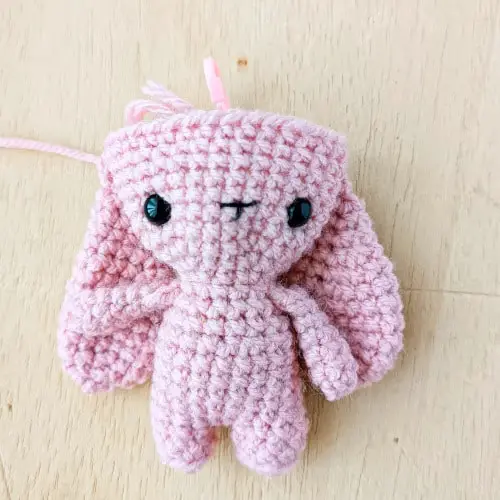
If you, like me, aren’t exactly best friends with sewing needles, then you will love our no-sew small crochet bunny pattern! If the idea of stitching makes you want to run for the hills, fear not, because this amigurumi pattern is hassle-free and oh-so-fun. This sweet little amigurumi bunny is the second member of our Kozu Palm Pets series of small amigurumi animals. The series began with our oh-so-cute small crochet elephant, which we crocheted as a really fun crochet-along and there are so many more to come. We also have a super cute no sew crochet duck pattern in the series.
Picture this: a super cute, cuddly amigurumi bunny without a single stitch in sight! Whether you’re a pro at amigurumi or just dipping your toes into the crafty waters, this long-eared bunny pattern is your new best friend. Grab your go-to yarn, and let’s bring this bunny buddy to life – and the best part? No sewing required!
About this Small Amigurumi Bunny Pattern
This amigurumi bunny pattern is completely no sew. That’s right! You don’t need to pick up your needle to crochet this bunny (well, except to close the magic circle or to weave in the ends – sorry, there’s no magic wand for that part yet but we can only dream lol). From the arms, to the ears, to the tail – everything is crocheted into the bunny as you go. However, to ensure that you are able to crochet the pieces in, you do need to make sure that you follow the order that the pattern calls for. You need to crochet the bunny’s arms and ears before the body, so that you can crochet them into the piece.
The pattern takes approximately 2 hours from start to finish, so is the perfect pattern to complete in front of the television after a long day. Have a craft fair coming up? Make one (or ten!) of these adorable amigurumi bunnies (don’t miss our awesome craft fair tips!).
This pattern is very basic and is a suitable no sew amigurumi pattern for beginners. It mostly consists of single crochet stitches. However, you do need to do a 4-DC-bobble stitch for the tail. We have instructions on how to do so under special stitches on the pattern.
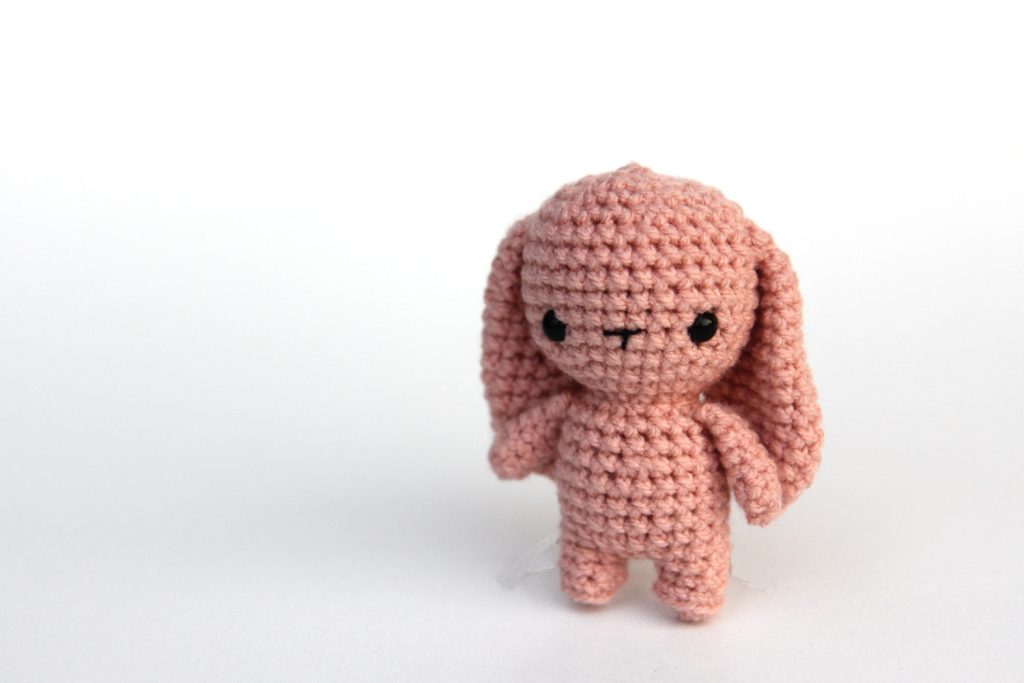
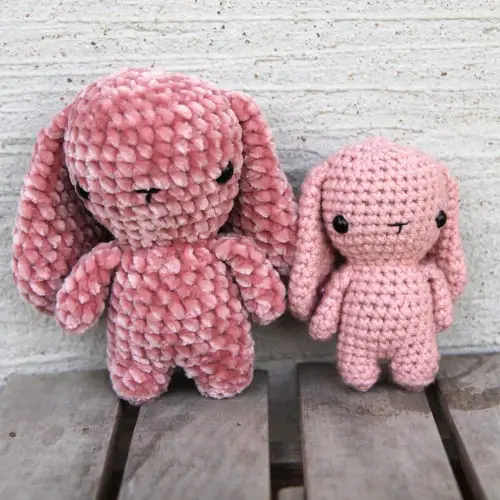
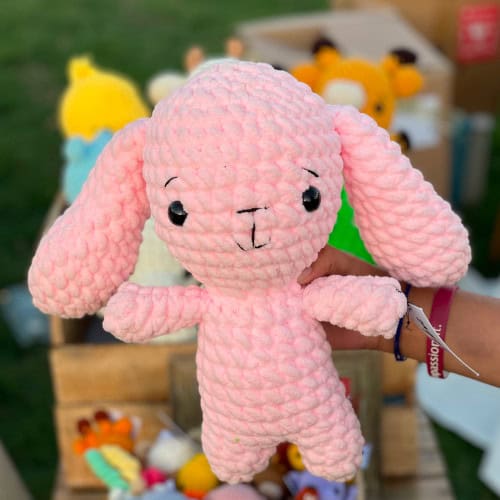
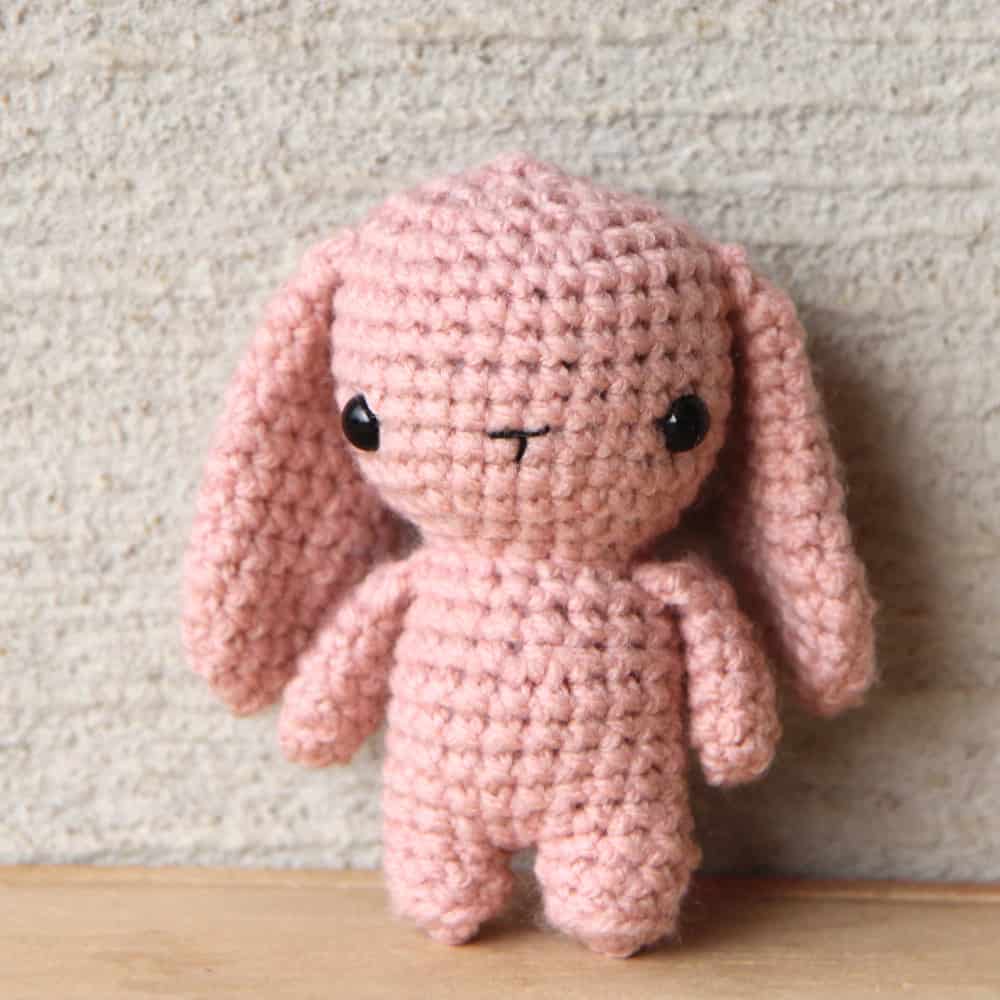
This bunny works up to be about 4 inches tall, using DK yarn and a 2.75mm hook. Prefer a larger bunny pattern? No problem! We tried this little guy with velvet yarn (with a 3.25mm hook and 9mm safety eyes) and he’s an adorable 6 inches tall. Want to crochet an even bigger bunny? Use blanket yarn (with a 3.25 mm hook and 16mm safety eyes) for 11.5 inches of cuddly cuteness! And the best part? No matter what size bunny you crochet, the pattern works up in a jiffy! Ready to hop into this yarny adventure with me?
Want to save this pattern for later? Save this pin to Pinterest.
Small Crochet Bunny Free Pattern
This pattern is for your personal use only and cannot be sold, copied, or reproduced in anyway without permission from the designers. You may sell finished objects made from this pattern but please give credit to chaicoffeecrochet.com as the pattern designers.
Tools & Materials You Will Need to Crochet a Bunny
- Yarn: You need a very small amount of yarn in the body colour
- 2.75 mm crochet hook for DK yarn
- Tapestry needle
- Stitch markers
- Polyfill stuffing
- Two 7 mm safety eyes
- Black embroidery thread
Crochet Bunny: Stitches and Abbreviations Used
This pattern is written in US terms and crocheted in continuous rounds unless specified otherwise.
Sl st: slip stitch
SC: single crochet
INV DEC: invisible decrease
INC: two SC in the same stitch
BLO: back loops only
4-DC-Bobble: See special stitches
Special Stitches
4-DC-Bobble:
We will be using this stitch to make the tail of your bunny.
- Yarn over. Insert hook into the next stitch. Pull up a loop. Yarn over and pull through two loops. (2 loops on your hook)
- Yarn over. Insert hook into the same stitch. Pull up a loop. Yarn over and pull through two loops. (3 loops on your hook)
- Yarn over. Insert hook into the same stitch. Pull up a loop. Yarn over and pull through two loops. (4 loops on your hook)
- Yarn over. Insert hook into the same stitch. Pull up a loop. Yarn over and pull through two loops. (5 loops on your hook)
- Then yarn over and pull through all five loops.
Finished size: Approximately 4 inches tall, using DK yarn and a 2.75mm hook
How to Crochet a Small Bunny
Arms (make 2)
Do not stuff
Using the body colour
Round 1: 6 SC into a magic circle (6)
Round 2-6 (5 rounds): SC around (6)
Pinch the two ends of the arm together, chain one, and 3 SC through both sides to close the arm. If you’re doing this for the first time, see the tutorial on how to crochet the arm closed. Fasten off.
Ears (make 2)
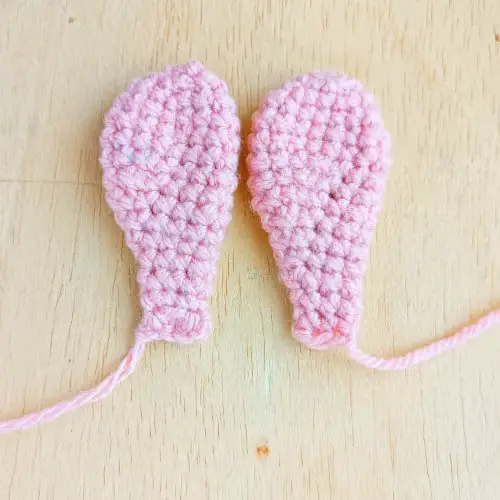
Using the body colour
Round 1: 5 SC into a magic circle (5)
Round 2: INC in each stitch (10)
Round 3: (SC, INC) five times (15)
Round 4-6 (3 rounds):SC around (15)
Round 7: 13 SC, INV DEC (14)
Round 8: 12 SC, INV DEC (13)
Round 9: 11 SC, INV DEC (12)
Round 10: 10 SC, INV DEC (11)
Round 11: 9 SC, INV DEC (10)
Round 12: 8 SC, INV DEC (9)
Round 13: 7 SC, INV DEC (8)
Round 14: 6 SC, INV DEC (7)
Round 15: 5 SC, INV DEC (6)
Now chain one, and 3 SC through both sides to close the ear. Fasten off. (If you’re unsure how to do this, see our tutorial on how to crochet in parts to amigurumi patterns.)
Legs
Use the body colour
Stuff the legs lightly as you go.
Round 1: 4 SC into a magic circle (4)
Round 2: INC in each stitch (8)
Round 3: SC around in BLO (8)
Round 4: SC around (8)
Fasten off. Make sure that you’ve pulled the magic circle tight so that stuffing doesn’t escape from it.
Repeat rounds 1-4 for the second leg but don’t fasten off.
Body
Stuff as you go. Now we will begin joining the legs (see our tutorial on how to join legs for amigurumi)
Round 5: Chain 2 and SC in the next unworked stitch of the first leg. Place a stitch marker in this stitch to mark the start of your round. SC in the remaining 7 stitches of the first leg until you reach the chain, SC in each of the 2 chains, SC in the 8 stitches of the next leg, and SC on the other side of each of the two chains until you reach your stitch marker. (20)
In the next round we will make the tail of your bunny.
Round 6: 18 SC, 4-DC-Bobble, SC (20)
Check that the bobble stitch is centered to the back of your bunny. If it isn’t, adjust its placement so that it is.
Round 7-10 (4 rounds): SC around (20)
Round 11:(8 SC, INV DEC) twice (18)
Round 12: SC around (18)
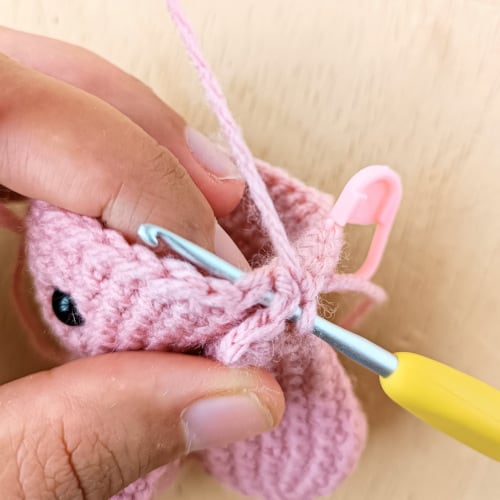
During the next round (Round 13), you will crochet the arms into your bunny on either side of the body by crocheting through both the body and the arm. See the tutorial on how to crochet in the arms of your bunny.
Round 13: SC around (18)
Round 14: (SC, INV DEC) six times (12)
Head
Round 15: (SC, INC) six times (18)
Round 16: (2 SC, INC) six times (24)
Round 17: (3 SC, INC) six times (30)
Round 18-23 (6 rounds): SC around (30)
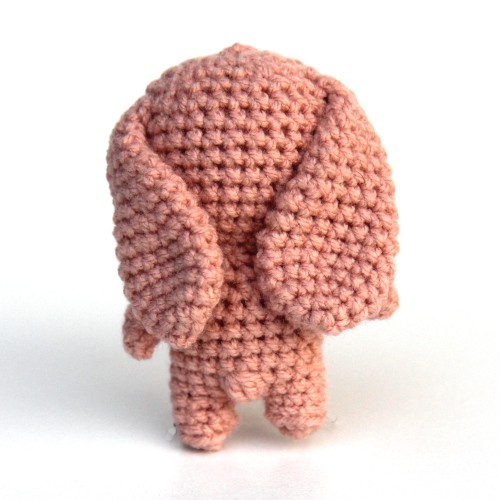
You now want to be at the center of the back of your bunny’s head so that in the next round you can crochet the ears evenly on either side of your bunny’s head. You may need to do a few more or less SC in the previous round to end up at the centre (where you end up could vary based on your yarn and tension). Mark that as the end of Round 23. To crochet in the ears of your bunny, you will crochet through both the head and the ear, like in the photo below.
Round 24: 5 SC, 3 SC through both the first ear and the head of your bunny, 14 SC, 3 SC through both the second ear and the head of your bunny, 5 SC (30)
Ensure that the ears of your bunny are evenly spaced on either side of the head. If they are not, redo the round, ensuring that you have started at the very centre of the back of your bunny. Embroider on the nose of your bunny between Rounds 18 and 19. If you’re using safety eyes, insert them between Rounds 19 and 20, evenly on both sides of the nose, eight stitches apart. Ensure that you have stuffed the body well, especially the neck.
Round 25: (3 SC, INV DEC) six times (24)
Round 26: (2 SC, INV DEC) six times (18)
Round 27: (SC, INV DEC) six times (12)
Ensure that you have stuffed the head well.
Round 28: INV DEC six times (6)
Fasten off and leave a tail. Insert the needle in the front loop of each stitch and pull tight to close. Your adorable bunny is now done!
Is this an easy bunny pattern for beginners?
Yes, this bunny pattern is very simple and should be easy for a beginner to crochet. The only stitch may be unfamiliar is the 4-DC-bobble for the tail. But that is a fairly easy stitch to crochet. Plus, you could always just leave it off and do a SC instead.
How do I crochet an large bunny?
If you prefer to crochet a larger bunny, you can try our Bixie the crochet Bunny from our Juna Series of amigurumi animals. Bixie is approximately 8″ tall. If you would prefer to crochet a larger version of this long-eared bunny, you can always use a thicker yarn with a relevant hook. With super bulky yarn, a 7mm crochet hook, and 16mm safety eyes, this cute rabbit can crochet to be up to 11″ tall!
How can I find more no sew amigurumi patterns?
The entire Kozu Palm Pets small crochet animals series is low-sew, which means that the body, head, and arms are all crocheted together. However, in our other animals, you do need to sew on a piece or two.
We also have a super popular no sew crochet fish pattern that works up really fast (15 minutes!). It makes for a great keychain. Plus, don’t miss our super easy tutorial that shows you how to attach arms or other body parts to amigurumi without sewing to turn other patterns into no sew (or low sew)!
You can also check out our awesome round up of new sew amigurumi patterns from some of our favourite designers.
How to I find more quick and small amigurumi patterns like this bunny?
If you want more quick and small amigurumi patterns like this bunny, you can try the other animals in our Kozu Palm Pets small crochet animal series. Or, if you would like to try some small dolls, our Kozu Palm Pals crochet dolls are 4.5 inches tall and just take a couple of hours to crochet!