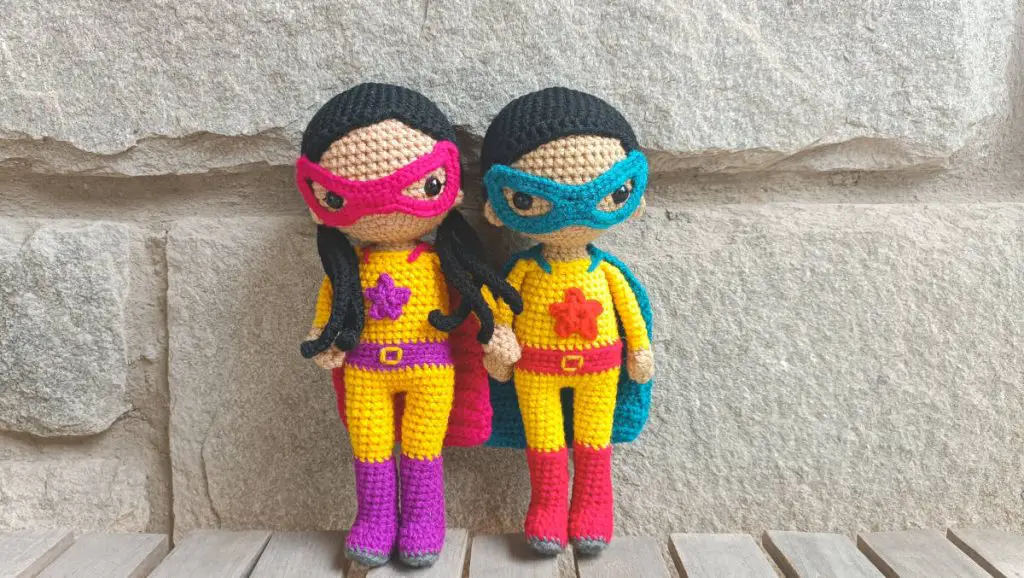
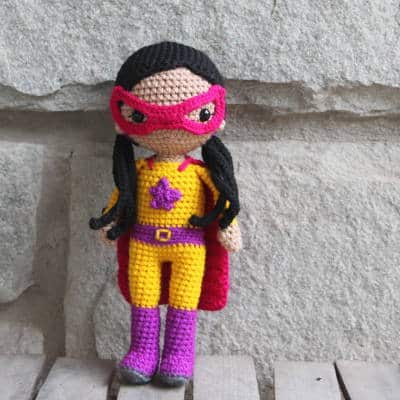
Amigurumi Superhero Dolls
We are really excited about our new crochet superhero dolls from our Zoya & Zayd crochet dolls series! Our mini crochet superhero dolls from our Kozu Palm Pals series of tiny crochet dolls have been some of our favourite patterns and we have been wanting to do a larger doll for a while (because why not have a snuggly version of cuteness too?).
Our family is superhero-obsessed! Whether its Marvel or DC, everyone from adult to child is obsessed with the movies! Everyone, that is, except me. I can’t STAND superhero movies! But I do love crochet so why not fit into the family fun and make a set of crochet superhero dolls! Lol.
The amigurumi superhero dolls are generic (rather than customised to a particular superhero) because I love to match them to the kids in my life to bring out their inner heroes! This would be a great crochet pattern for boys and girls alike!
About this Crochet Superhero Pattern
This amigurumi superhero pattern works up pretty quickly – they take me about six hours each to make. I love that, since they are from our Zoya & Zayd series of crochet dolls, they can be customised to match the recipient by using any of the haircaps from the other dolls in the series. The mask is a little bit oversized on purpose – I just thought it looked really cute! You can play with the colours of your superhero doll to make it just as you’d like. You could either do the favourite colours of your recipient, or maybe the colours of your favourite hero!
Our crochet superhero dolls work out to be about 10.5 inches using DK yarn and a 2.75mm crochet hook. However, you can make them bigger by using thicker yarn or smaller using thinner yarn and the relevant hook. One of our awesome pattern testers, Nicole Reagan (check out her incredible work at @nicolescreativecrochet on Instagram!), crocheted her doll using super bulky blanket yarn and a 6.5 mm crochet hook. Her superhero doll turned out to be a whopping 20 inches of snuggly cuteness! (You can see her doll below in comparison with the Zoya doll in overalls that she tested for us last year!)

This crochet superhero pattern is easy and is suitable for beginners. The trickiest bit will be making the legs, which are crocheted around the foundation chain but we have a great tutorial on crochet ovals that will help explain how to do this, step-by-step.
Now let’s get ready to crochet our superhero dolls!

Want to save this pattern for later? Pin it to Pinterest!
Crochet Superhero Free Pattern
This pattern is for your personal use only and cannot be sold, copied, or reproduced in any way without permission from the designers. You may sell finished objects made from this pattern in small quantities but please give credit to chaicoffeecrochet.com as the pattern designer.
Tools and Supplies You Will Need
- Yarn: Less than 50 grams of DK yarn in skin colour, costume colour, and cape and mask colour, and hair colour. A small amount in the costume accent colour and soles of the shoes.
- 2.75mm crochet hook
- Tapestry needle
- Stitch marker
- Polyfill stuffing
- Two 10 mm safety eyes
- Embroidery thread in black for the eyelashes and light pink for the mouth.
Stitches Used and Abbreviations
This pattern is written in US terms and crocheted in continuous rounds, unless specified otherwise.
Sl st: slip stitch
SC: single crochet
INV DEC: invisible decrease
INC: two SC in the same stitch
BLO: back loops only
HDC: half double crochet
DC: double crochet
4 DC Bobble: See special stitches.
Special stitches
4 DC Bobble:
We will be using this stitch to make the thumb on your doll’s hand.
- Yarn over. Insert hook into the next stitch. Pull up a loop. Yarn over and pull through two loops. (2 loops on your hook)
- Yarn over. Insert hook into the same stitch. Pull up a loop. Yarn over and pull through two loops. (3 loops on your hook)
- Yarn over. Insert hook into the same stitch. Pull up a loop. Yarn over and pull through two loops. (4 loops on your hook)
- Yarn over. Insert hook into the same stitch. Pull up a loop. Yarn over and pull through two loops. (5 loops on your hook)
- Then yarn over and pull through all five loops.
Finished size: Approximately 10.5 inches tall
How to Crochet a Superhero Doll
Arms (make 2)
Begin with skin colour yarn. Stuff the arms lightly at the bottom and leave the rest of the arm unstuffed.
Round 1: 6 SC in a magic circle (6)
Round 2: (2 SC, INC) twice (8)
Round 3: SC around (8)
Round 4: 3 SC, 4 DC bobble, 4 SC (8)
Round 5: 6 SC, INVDEC (7)
Change to costume colour
Round 6: SC around (7)
Round 7: SC around in BLO (7)
Round 8-17 (10 rounds): SC around (7)
If you want to crochet (instead of sew) on the arms of your doll, continue SC until you reach the side of the arm of your doll. Now pinch the two ends of the arm together, chain one, and single crochet through both sides to close the arm. Weave in the ends. See our tutorial on a no-sew way to attach arms to your amigurumi.
If you prefer to sew on the arms, fasten off and leave a long tail for sewing.
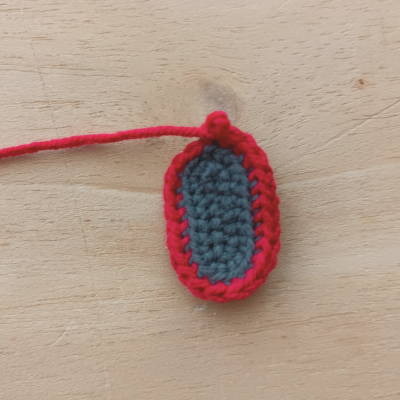
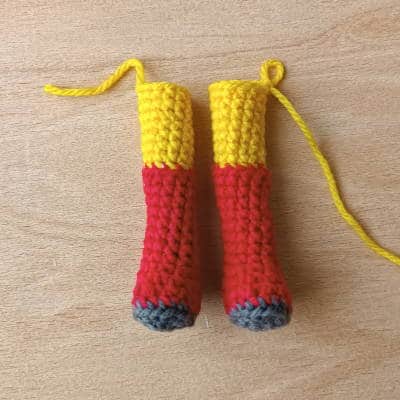
Legs (make 2)
Begin with the soles of the shoes colour. The base of the leg is crocheted as an oval (around the foundation chian). If this is your first time doing this, see our tutorial on how to crochet an oval.
Stuff as you go.
Round 1: Chain 7. Starting in the second chain from the hook, INC, 4 SC, 4 SC in the next chain as your work turns. Now continue on the other side of the chain. 4 SC and INC in the last chain (16)
Round 2: (INC) in each of the first two stiches, 4 SC, (INC) in each of the next 4 stitches, 4 SC, (INC) in each of the next two stitches (24)
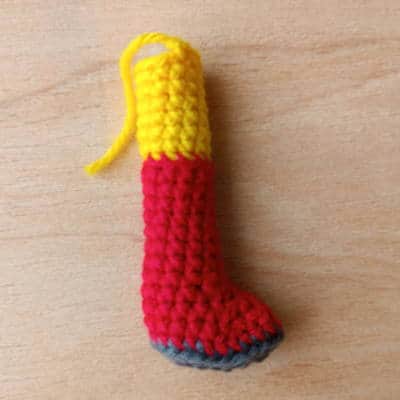
Change to the costume accent colour (for the boots)
Round 3: SC around in BLO (24)
At this stage you want to be at the center of the shoe so that the decreases are evenly spaced. You may need to do one more SC or so to get to the center (the placement of where you end up could vary based on your yarn and tension) and then mark that as the end of Round 3.
Round 4: 6 SC, INV DEC, 2 SC, (INV DEC) twice, 2 SC, INV DEC, 6 SC (20)
Round 5: 5 SC, INV DEC, SC, (INV DEC) twice, SC, INV DEC, 5 SC (16)
Round 6: 4 SC, (INV DEC) four times, 4 SC (12)
Round 7-14 (8 rounds)): SC around (12)
Change to the costume colour
Round 15: SC around in BLO (12)
16-22 (7 rounds): SC around (12)
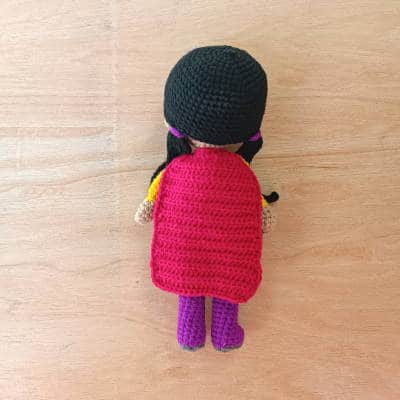
You should be on the left side of the leg in the middle, like in this photo. If you’re not there (since this may vary based on the yarn you use and your tension), do any additional stitches you need to get there.
Fasten off for the first leg.
Do the same for the second leg. However, in Round 22 continue for 6 more stitches than you did for the first leg, until you end up on the right side of the leg at the center, opposite of where you ended up on the first leg. This way, when you join the legs, both legs will be facing forward. You will be joining the legs from the back of your doll so that all the colour changes stay in the back.
Do not fasten off for the second leg.
Body
Round 23: Chain 3 and SC in the next unworked stitch of the first leg. Place a stitch marker in this stitch to mark the start of your round. SC in the remaining 11 stitches of the first leg until you reach the chain, SC in each of the 3 chains, SC in the 12 stitches of the next leg, and SC on the other side of each of the three chains until you reach your stitch marker. (30)
See photo tutorial on how to join the legs at the end of the pattern.
Round 24: (9 SC, INC) three times (33)
Round 25-26 (2 rounds): SC around (33)
Change to costume accent colour
Round 27: SC around (33)
Round 28: SC around in BLO (33)
Round 29: SC around (33)
Change to costume colour
Round 30: SC around in BLO ( 33)
Round 31: (9 SC, INVDEC) three times (30)
Round 32-36 (5 rounds): SC around (30)
Round 37: (8 SC, INVDEC) three times (27)
Round 38-39 (2 rounds): SC around (27)
Round 40: (7 SC, INV DEC) three times (24)*
*If you want to crochet your arms in, crochet them on during Round 40, on each side of the body, making sure that the thumbs are pointing forward. To attach the arms, crochet through both the body and the arm. (See the tutorial on how to crochet on the arms.)
Change to skin colour
Round 41: (2 SC, INV DEC) six times in BLO (18)
Round 42: (SC, INV DEC) six times (12)
We will now continue onto the head. Do not fasten off.
Head
Round 43: SC around (12)
Round 44: (SC, INC) six times (18)
Round 45: (2 SC, INC) six times (24)
Round 46: (3 SC, INC) six times (30)
Round 47: (4 SC, INC) six times (36)
Round 48: (5 SC, INC) six times (42)
Round 49: (6 SC, INC) six times (48)
Round 50-59 (10 rounds): SC around (48)
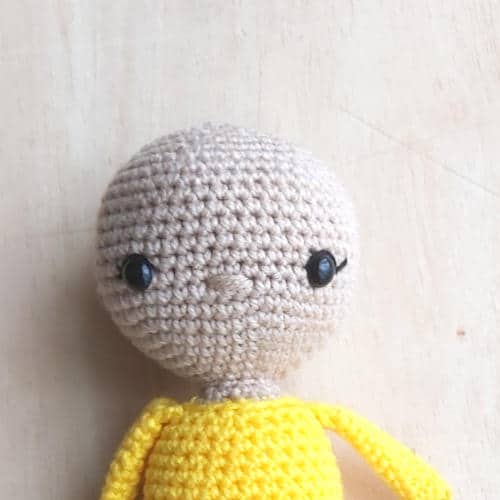
Insert safety eyes between Rounds 52 and 53, eight stitches apart. Once you are satisfied with the placement of the eyes, embroider on eyelashes if you’re making a girl doll. You can also embroider on eyebrows (but they won’t be seen over the mask). Put the washer firmly on the back. Ensure that the neck is firm so that you don’t end up with a wobbly head (see our tutorial on how to prevent wobbly heads in crochet dolls.)
Round 60: (6 SC, INVDEC) six times (42)
Round 61: (5 SC, INVDEC) six times (36)
Round 62: (4 SC, INVDEC) six times (30)
Round 63: (3 SC, INVDEC) six times (24)
Round 64: (2 SC, INVDEC) six times (18)
Ensure that the head is well stuffed.
Round 65: (SC, INVDEC) six times (12)
Round 66: INVDEC six times (6)
Fasten off and leave a long tail to embroider on the nose. Insert needle in front loop of each stitch and pull tight to close. Use the yarn tail to embroider on the nose by making two to three passes over three stitches, one row below the eyes. Use light pink to embroider on the mouth three rows below the nose. If you haven’t yet attached the arms, sew them on between rounds 40 and 41. Using yellow yarn, embroider on a belt buckle onto the belt of your doll.
Hair Caps
Note: This pattern comes with one hair cap each for the boy and girl superhero dolls. However, any of the hair caps in Zoya & Zayd crochet dolls series should fit this doll.
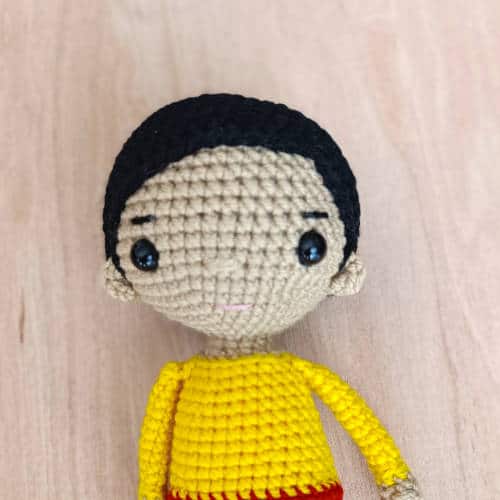
Boy Hair Cap
Use hair colour yarn
Round 1: 6 SC in a magic circle (6)
Round 2: INC in each stitch around (12)
Round 3: (SC, INC) six times (18)
Round 4: (2 SC, INC) six times (24)
Round 5: (3 SC, INC) six times (30)
Round 6: (4 SC, INC) six times (36)
Round 7: (5 SC, INC) six times (42)
Round 8: (6 SC, INC) six times (48)
Round 9-18 (10 rounds): SC around (48)
Round 9-18 (10 rounds): SC around (48)
Note: The hair cap width can vary based on the yarn that you’re using so try it onto your doll’s head and see if you want to increase or decrease rounds here before working on the final round.
Round 19: The hair cap instructions for this round can be confusing so I’m going to break them down into sections. Please note that the next section of bullet points are all for Round 19 of the hair cap:
- First we will make the front parting of the hair. 15 DC, sl st in the next 2 stitches, 11 DC, sl st
- 19 SC and sl st to the first st
Fasten off and leave a long tail for sewing. Sew onto the doll’s head.
Girl Hair Cap

Use hair colour yarn
Round 1: 6 SC in a magic circle (6)
Round 2: INC in each stitch around (12)
Round 3: (SC, INC) six times (18)
Round 4: (2 SC, INC) six times (24)
Round 5: (3 SC, INC) six times (30)
Round 6: (4 SC, INC) six times (36)
Round 7: (5 SC, INC) six times (42)
Round 8: (6 SC, INC) six times (48)
Round 9-18 (10 rounds): SC around (48)
Note: The hair cap width can vary based on the yarn that you’re using so try it onto your doll’s head and see if you want to increase or decrease rounds here before working on the final round.
Round 19: The hair cap instructions for this round can be confusing so I’m going to break them down into sections. Please note that the next section of bullet points are all for Round 19 of the hair cap:
- First we will begin by making three long strands for the first ponytail: [Chain 26, starting from the second chain on the hook, 25 HDC back down the chain, slip stitch in the next SC in the hair cap]. Repeat until you have a total three strands.
- Now we will make the front parting of the hair. 15 DC, sl st in the next 2 stitches, 13 DC, sl st
- Now we will begin by making three long strands for the second ponytail: [Chain 26, starting from the second chain on the hook, 25 HDC back down the chain, slip stitch in the next SC in the hair cap]. Repeat until you have a total three strands.
- SC 11. Sl st to the base of the first braid.
Fasten off and leave a long tail for sewing.Sew onto head, with the long strands at the base of the head, evenly apart.Tie the strands together by chaining 7 in the accent colour and sewing it around the base of the ponytails. You can also Braid the strands and tie them tight with scrap yarn.
Ears (make 2)
Use skin colour
Round 1: 4 SC in a magic circle (4)
Fasten off and sew onto the head at the edge of the haircap, between Rounds 51 and 53.
Star
Use costume accent colour
In a magic circle, [Ch 3, starting from the second chain from your hook, SC, HDC, and sl st into the magic circle]. Repeat for a total of 5 times so that you have the 5 points of a star.
Fasten off and leave a long tail for sewing. Sew the star onto the center of the chest of your doll.
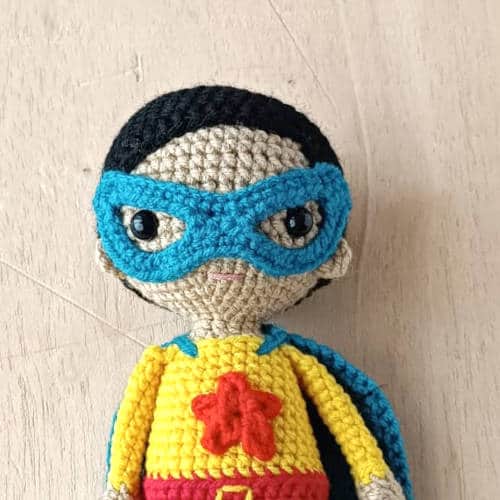
Mask
Use mask colour
Note: The mask will be worked in rows. The chain 2 at the start of each row doesn’t count as a stitch.
Row 1: Chain 23. Starting from the second chain on your hook, 22 SC. Chain 2 and turn. (22)
Row 2: 2 HDC, Ch 11, skip 7 stitches, 4 HDC, Ch 11, skip 7 stitches, 2 HDC. Chain 2 and turn. (8 stitches, and 22 chains)
Row 3: 2 SC, SC in each of the 11 chains, 4 SC, SC in each of the 11 chains, 2 SC (30 SC)
Fasten off and leave a long tail for sewing.
Note: Try the mask on your doll. If it feels too big (our doll head sizes can vary due to variations in yarn colour, tension, and stuffing), try making it with a smaller hook.
Pin the mask onto your doll’s face and sew it in place.
Cape
Use cape colour
Note: The cape will be worked in rows. The chain 2 at the start of each row doesn’t count as a stitch.
Leave approximately 12 inches of yarn at the start of your cape before you make your slip knot so that you can use that to sew the cape onto your doll.
Row 1: Chain 12. Starting from the third chain from your hook, 10 HDC. Chain 2 and turn. (10)
Row 2: HDC INC, 8 HDC, HDC INC. Chain 2 and turn. (12)
Row 3: HDC INC, 10 HDC, HDC INC. Chain 2 and turn. (14)
Row 4: HDC INC, 12 HDC, HDC INC. Chain 2 and turn. (16)
Row 5: HDC INC, 14 HDC, HDC INC. Chain 2 and turn. (18)
Row 6-19 (14 rounds): 18 HDC. Chain 2 and turn. (18)
Note: The number of rounds can vary based on the yarn you’re using so you may need to adjust the number of rows. You will want your cape to reach to approximately the top of your doll’s boots.
Once you have reached the desired length, Ch 1 and SC around your cape and sl st to the first SC. Fasten off and weave in the ends. Use the strand of yarn that you left at the start of your cape to sew it onto the shoulders of your doll, making two passes on each shoulder to keep it in place.
Your adorable crochet superhero is now complete! If you enjoyed this, why not check out more dolls in our Zoya & Zayd series of crochet dolls.
Frequently Asked Questions
How do I crochet a small superhero doll?
If you would like to decrease the size of your superhero doll, you can crochet it using a thinner yarn and the appropriate smaller hook. You can also try our mini crochet superhero dolls that work up to be just 4.5 inches tall!
How do I crochet a large superhero doll?
Our amigurumi superheroes turn out to be approximately 10.5 inches tall. However, if you would prefer a larger doll, you could use bulkier yarn and a larger hook. See the example of the amazingly adorable superhero crocheted by one of our pattern testers using super bulky blanket yarn – she’s 20 inches tall! How’s that for a whole lot of snuggles?
Is this superhero crochet doll easy to make?
Yes, this pattern is quite simple and we link to a number of tutorials. You will need to know basic stitches and techniques for amigurumi to begin. However, once you can do those, it is simple enough. We have had beginners crochet this doll. And if you need help, pop by our Facebook group with your questions – it’s always so much more fun to crochet in community!