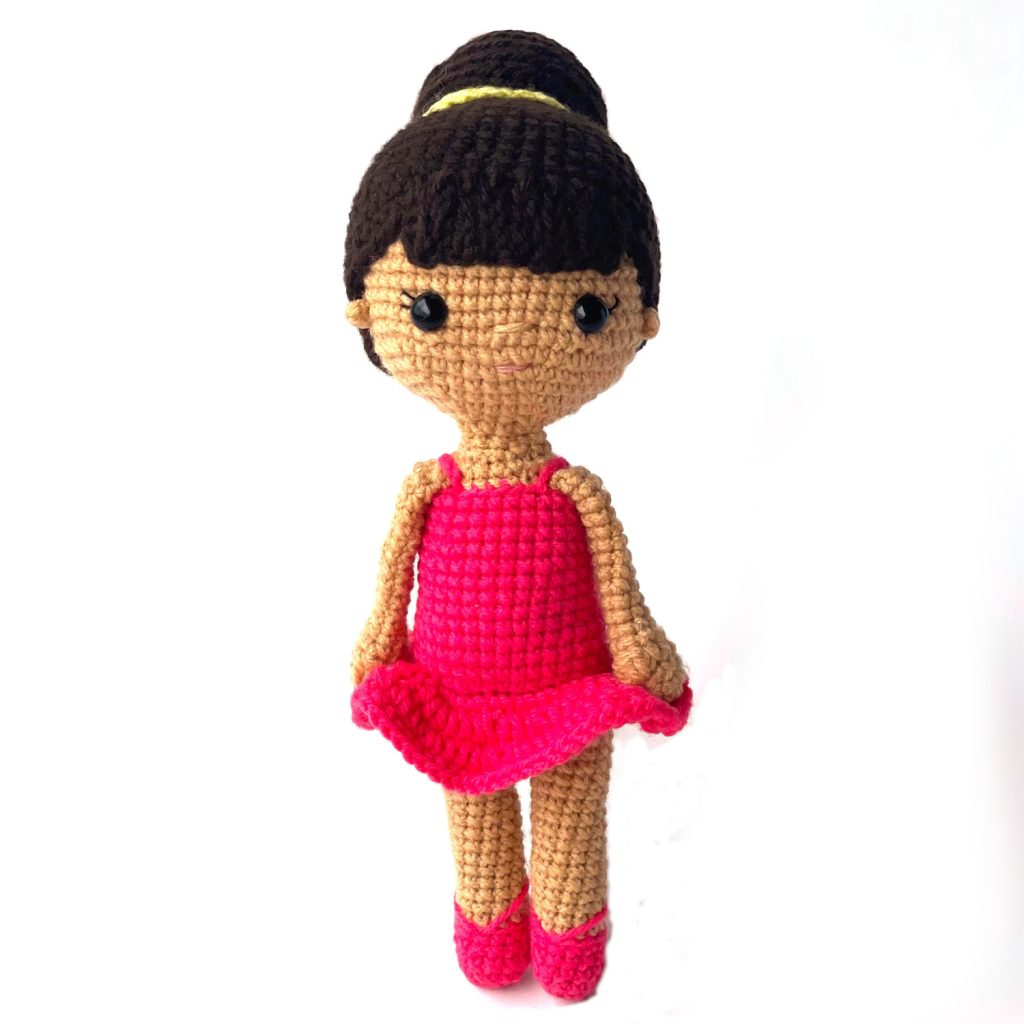
Crochet an Easy Crochet Doll for Beginners!
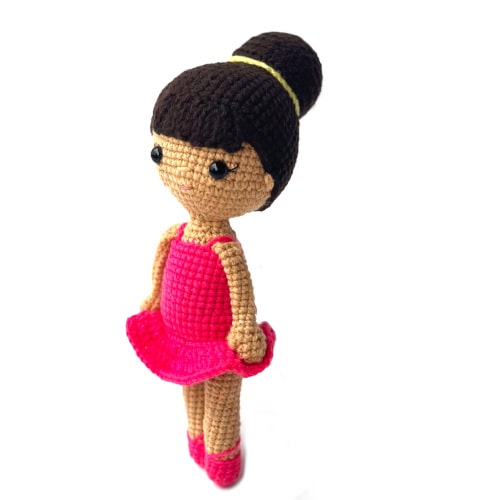
Zoya the crochet ballerina doll will surely dance her way into your heart. I love this doll because it’s a really easy crochet doll pattern for beginners. When I was little, I remember taking ballet lessons. To be honest, I wasn’t any good (two left feet anyone? lol!) but I had to crochet a ballerina doll for my younger self!
The most exciting part is that this amigurumi ballerina doll is the first free pattern of the Zoya and Zayd crochet doll series, the newest series on our blog. So look out for more adorable cute crochet dolls from this series!
About this Easy Ballerina Crochet Doll Pattern
At approximately 10.5 inches tall, Zoya is perfectly huggable. This is a great crochet doll for beginners, as the pattern is very simple. We initially released the pattern as a crochet along. We had a number of beginners try out this pattern and they did a great job!
Like our Kozu Palm Pals series of mini dolls, the Zoya series has the legs, body, and head all worked in one piece for minimal sewing. The pattern has a built-in dress and a simple bun hair cap, making it a great pattern for crocheters at all skill levels.
When I was initially looking for ballerina patterns to crochet, I had noticed that most of the dolls were extremely skinny (like tiny bodies and tiny waists!) and so I wanted to crochet a doll that that a little bit of a rounder tummy and looked more natural (like really do we need more unrealistic body type expectations for young girls?).
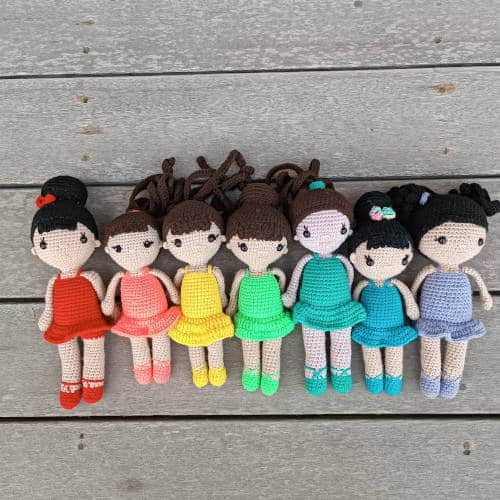
I love the little hair bun. However, you can change up the hair styles as you like, as the crochet hair caps for all the crochet dolls in the series can be interchanged!
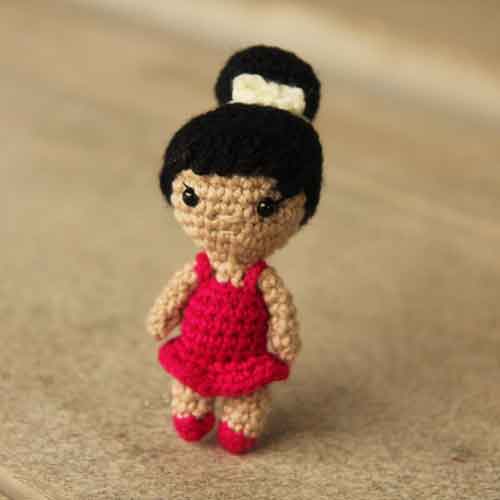
If you prefer to crochet a smaller ballerina doll, check out our Zara mini amigurumi ballerina doll, which is part of our Kozu Palm Pals series. She takes just a couple hours to crochet and is super adorbs!
If you would like an ads-free, print-friendly PDF version of our pattern, you can buy it from our Ravelry store.
Want to save this pattern for later? Save this pin to your Pinterest board.
Crochet Ballerina Doll Free Pattern
This pattern is for your personal use only and cannot be sold, copied, or reproduced in any way without permission from the designers. You may sell finished objects made from this pattern in small quantities but please give credit to chaicoffeecrochet.com as the pattern designer.
Tools and Supplies You Will Need
- Yarn: Less than 100 grams of DK yarn in skin colour and a small amount in the dress, hair, and bow colour. Note: We used DK yarn but any yarn with the relevant hook will do.
- 2.75mm crochet hook
- Tapestry needle
- Stitch marker
- Polyfill stuffing
- Two safety eyes: The size can vary based on your preference and the look you want to achieve. We used 9mm eyes but anything between 9-12mm would work. You can also crochet on the eyes.
- Embroidery thread or sock yarn in black for eyelashes and pink for mouth
Stitches Used and Abbreviations
This pattern is written in US terms and crocheted in continuous rounds, except where specified otherwise.
Sl st: slip stitch
SC: single crochet
INV DEC: invisible decrease
INC: two SC in the same stitch
BLO: back loops only
HDC: Half double crochet
HDC INC: two HDC in the same stitch
Finished size: Approximately 10.5 inches tall (excluding the bun).
How to Crochet a Ballerina Doll
Arms (make 2)
Use skin colour yarn. Stuff the arms lightly at the bottom and leave the rest of the arm unstuffed.
Note: This arm is made to be simple, since this is a crochet doll for beginners. If you would prefer the arm to have more of a hand shape and a thumb, you can crochet Round 1-5 of the arms from the Zoya doll with overalls and then continue this pattern from Round 6 onwards.
Round 1: 7 SC in a magic circle (7)
Round 2-17 (16 rounds): SC around (7)
Fasten off and leave a long tail for sewing.
Tip: If you want to crochet the arms on your ballerina instead of sewing them on, see our tutorial on crocheting arms to your amigurumi to see how to finish off the arms.
If you prefer to sew the arms to your ballerina doll, fasten off and leave a long tail for sewing.
Legs (make 2)
Begin with the dress colour yarn for the shoes.
Stuff as you go.
Round 1: 6 SC into a magic circle (6)
Round 2: INC in each stitch around (12)
Round 3-6 (4 rounds): SC around (12)
Change to skin colour.
Round 7: SC around in BLO (12)
Round 8-22 (15 rounds): SC around (12)
Fasten off for the first leg.
Repeat rounds 1-22 for the second leg but don’t fasten off.
Body
Change to the dress colour yarn.
We will now join the legs for our ballerina dolls.
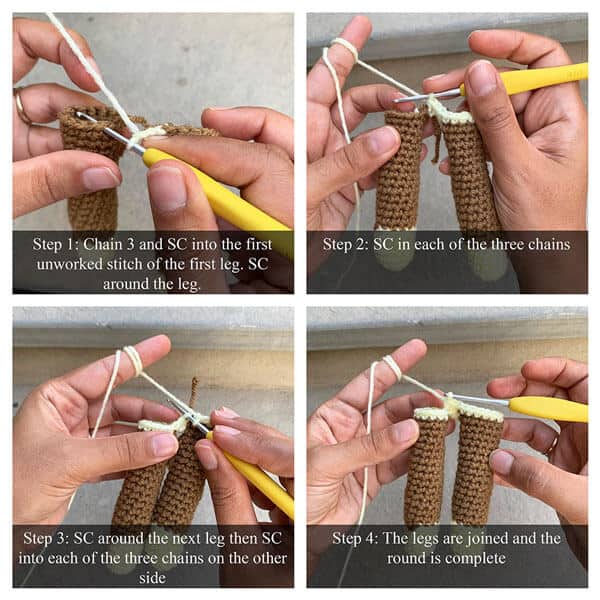
Round 23: Chain 3 and SC in the next unworked stitch of the first leg. Place a stitch marker in this stitch to mark the start of your round. SC in the remaining 11 stitches of the first leg until you reach the chain, SC in each of the 3 chains, SC in the 12 stitches of the next leg, and SC on the other side of each of the three chains until you reach your stitch marker. (30)
Round 24: (9 SC, INC) three times (33)
Round 25-26 (2 rounds): SC around (33)
Round 27: SC in each stitch in BLO (33)
Round 28-30 (3 rounds): SC around (33)
Round 31: (9 SC, INVDEC) three times (30)
Round 32-36 (5 rounds): SC around (30)
Round 37: (8 SC, INVDEC) three times (27)
Round 38-39 (2 rounds): SC around (27)
Change to skin colour.
*If you are crocheting on the arms for your ballerina doll, you will attach them in Round 40. See the tutorial on how to crochet on the arms for instructions. If you are planning on sewing on the arms, you will sew them on once we are done with the body.
Round 40: (7 SC, INV DEC) three times in BLO (24)*
Round 41: (2 SC, INV DEC) six times (18)
Round 42: (SC, INV DEC) six times (12)
We will now continue onto the head. Do not fasten off.
Head
Round 43: SC around (12)
Round 44: (SC, INC) six times (18)
Round 45: (2 SC, INC) six times (24)
Round 46: (3 SC, INC) six times (30)
Round 47: (4 SC, INC) six times (36)
Round 48: (5 SC, INC) six times (42)
Round 49: (6 SC, INC) six times (48)
Round 50-59 (10 rounds): SC around (48)
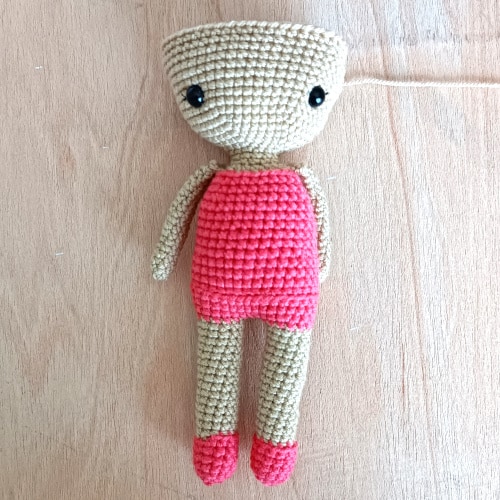
Insert safety eyes between Rounds 52 and 53, eight stitches apart. Once you are satisfied with the placement of the eyes, embroider on eyelashes . Put the washer firmly on the back. Ensure that the neck has been firmly stuffed so that you don’t end up with a wobbly head (see our tips on how to avoid a wobbly head in crochet dolls).
Round 60: (6 SC, INVDEC) six times (42)
Round 61: (5 SC, INVDEC) six times (36)
Round 62: (4 SC, INVDEC) six times (30)
Round 63: (3 SC, INVDEC) six times (24)
Round 64: (2 SC, INVDEC) six times (18)
Ensure that the head is well stuffed.
Round 65: (SC, INVDEC) six times (12)
Round 66: INVDEC six times (6)
Fasten off and leave a long tail to embroider on the nose. Insert needle in front loop of each stitch and pull tight to close. Use the yarn tail to embroider on the nose by making two to three passes over three stitches, one row below the eyes. Use light pink to embroider on the mouth three rows below the nose. Add a little blush on the cheeks if you like, using regular blush and a paintbrush. If you haven’t already attached the arms, you can sew them on now between Rounds 40 and 41.
Hair Cap
Use hair colour yarn
Round 1: 6 SC in a magic circle (6)
Round 2: INC in each stitch around (12)
Round 3: (SC, INC) six times (18)
Round 4: (2 SC, INC) six times (24)
Round 5: (3 SC, INC) six times (30)
Round 6: (4 SC, INC) six times (36)
Round 7: (5 SC, INC) six times (42)
Round 8: (6 SC, INC) six times (48)
Round 9-18 (11 rounds): SC around (48)
Note: The hair cap width can vary based on the yarn that you’re using so try it onto your doll’s head and see if you want to increase or decrease rounds here before working on the final round.
Round 19: The hair cap instructions for this round can be confusing so I’m going to break them down into sections. Please note that the next section of bullet points are all for Round 16 of the hair cap:
- First we will begin by making eight bangs in the front of the head: [Chain 5, starting from the second chain on the hook, 4 sl st back down the chain, slip stitch in the next SC in the hair cap]. Repeat until you have a total of eight bangs.
- 40 SC
Fasten off and leave a long tail for sewing. Sew onto head. Put one stitch into each of the bangs on the doll’s forehead while you are sewing to keep them in place.
Ears (make 2)
Use skin colour
Round 1: 4 SC in a magic circle (4)
Fasten off and sew onto the head between Rounds 51 and 53, in front of the hair cap.
Hair bun
Use hair colour yarn. We will be working in BLO for the bun.
Round 1: 6 SC in a magic circle (6)
Round 2: INC six times in BLO (12)
Round 3: (SC, INC) six times in BLO (18)
Round 4: (2 SC, INC) six times in BLO (24)
Round 5: (3 SC, INC) six times in BLO (30)
Round 6: (4 SC, INC) six times in BLO (36)
Round 7-9 (3 rounds): SC around in BLO (36)
Round 10: (4 SC, INVDEC) six times in BLO (30)
Round 11: (3 SC, INVDEC) six times in BLO (24)
Round 12: (2 SC, INVDEC) six times in BLO (18)
Fasten off and leave a long tail for sewing. Stuff the bun and sew it on. Chain a length in an accent colour that will fit around the hair bun and fasten off. Sew it around the hair bun as a hair tie.
Skirt Frill
Use dress colour yarn
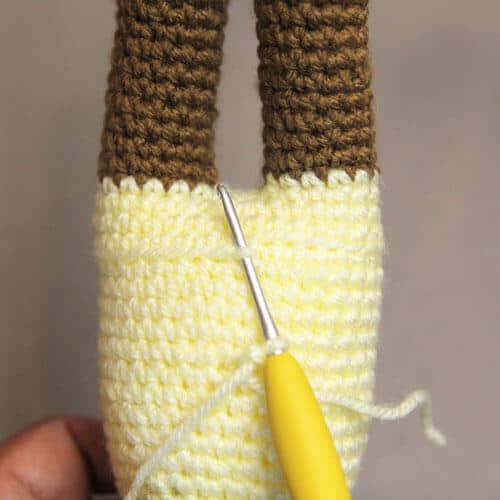
Turn the doll upside down and attach yarn in the back of the doll, in the front loops left unworked from Round 26. We will be working in joined rounds for the skirt. The chain 1 doesn’t count as a stitch.
Round 1: Chain 1. INC, 32 SC. Sl st to the first SC of the round. (34)
Round 2: Chain 1. (HDC, HDC INC) seventeen times. Sl st to the first HDC of the round. (51)
Round 3: Chain 1. (2 HDC, HDC INC) seventeen times. Sl st to the first HDC of the round. (68)
Round 4: Chain 1. SC in each stitch around. Sl st to the first SC of the round. (68)
Fasten off and weave in the ends.
Bow (optional)
Use the bow colour yarn.
Row 1: Chain 5. Starting from the second chain from the hook, HDC INC, 2 SC, 6 HDC in the last chain space as your work turns. Now continue on the other side of the chain. 1 SC in each of the next 2 chains, 4 HDC in the last chain. Sl st to the first HDC.
Fasten off and leave a long tail. Wrap your tail around the centre of your bow and sew it in front of the bun.
Dress Straps (make 2)
Use the dress colour yarn.
Chain 6 and fasten off and leave a long tail for sewing. Sew the dress straps onto the shoulders of your doll.
Shoe Straps
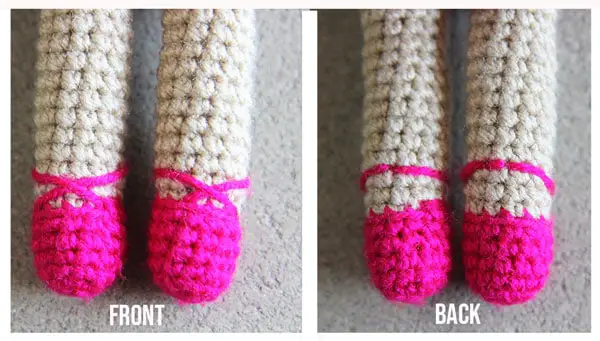
Use the dress colour yarn. Cut a long strand of yarn and sew it onto the one side of the shoe, towards the back on the other side of the shoe, and across the first strap to the second side of the shoe. To keep the strap in place, sew the strap over one stitch in the back.
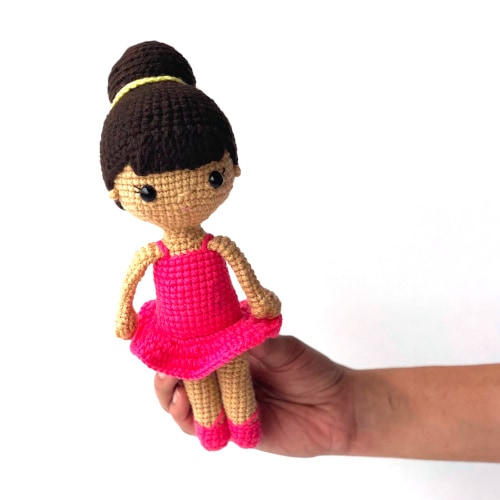
You have finished crocheted your ballerina doll! We would love to see how your ballerina turned out so please share on our Facebook group or on Instagram, tagging us @chaicoffeecrochet
If you’re looking for more dolls, check out the rest of the dolls in our Zoya and Zayd crochet doll series. Or if mini crochet dolls are your thing, why not crochet a mini amigurumi ballerina doll instead?

Is this ballerina doll an easy crochet doll for beginners?
Yes! I would recommend this doll as a first crochet doll, as it is very simple to make and is just so cute! The legs shape is very simple – it’s just a tube. We have kept the arms very simple too (although we do give an option to make them more complex). If you’re just starting out with amigurumi and looking to crochet your first doll, this ballerina doll is perfect!
How do you crochet a small ballerina doll?
If you would like to crochet a small ballerina doll, don’t miss our Zara the mini crochet ballerina doll from our Kozu Palm Pals series of small crochet dolls. At just 4.5 inches tall, she takes just a couple of hours to crochet. You could also make both of them for a truly adorable duo!
How do you crochet a larger ballerina doll?
If you would like to crochet a larger ballerina doll, you can just try a thicker yarn and a larger hook! One of our pattern testers crocheted the superhero doll from this series (which is the same size as this pattern) using super bulky blanket yarn and a 6.5mm crochet hook and it turned out to be 20 inches tall! How fun is that?
How do you prevent wobbly heads in crochet dolls?
One of the biggest challenges in crocheting dolls for beginners is preventing the doll’s head from wobbling. Amigurumi dolls usually have larger heads than bodies (they give them that adorable doll look!) so the doll head sometimes is very heavy for the doll, particularly after you add in the hair. But do not worry, we have an excellent tutorial on how to prevent wobbly heads for your crochet dolls.
